
Audio Mixer Basics
Audio mixers are an essential part of any broadcast production. An audio mixer is used to combine multiple audio sources and create the soundtrack that accompanies every live broadcast. While there are many manufacturers and models of audio mixer, they all have the same basic functions. In this article we will go over some essential basic audio concepts as well as the function of the basic parts of an audio mixer. There are some differences between analog audio mixers and digital audio mixers, but the differences mainly relate to the specifics of where features live. For example, many of the knobs and buttons on an analog mixer are menu driven items on a digital mixer. That said, nearly all the basic concepts translate between digital and analog audio mixers. For this article, we are using an analog audio mixer as the example.

Basic Concepts
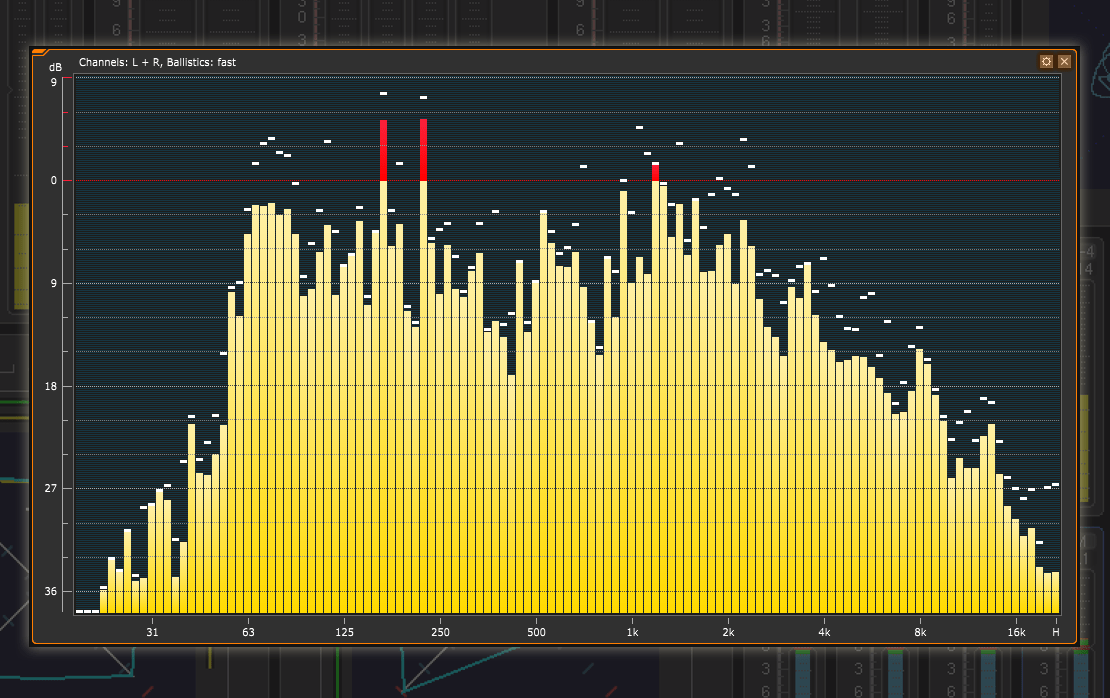
Audio is measured on a scale called dbV. The focus for our basic introduction is to give you the ability to read and understand what the scale means. The bottom of the scale will typically be either -40 or -30 dbV. Anything below that is basically inaudible. The next most important marking on the scale is 0 dbV. The correct level for a broadcast is typically 0 dbV. Anything lower the 0 is typically quieter than a broadcast station will want programming delivered to them. Lastly, +24 dbV is the last marking on the scale that is important to recognize. Any audio over +24 dbV will “clip”, which means it will distort and sound unpleasant. Typically when mixing audio, you want the level to be as close to 0 dbV as possible.
Mic Level vs Line Level
Different devices generate/capture audio at different levels. Typically devices will fall in one of two different categories. The will either be line level (-20 dbV) or mic level (-60 dbV). Signals that are mic level, most commonly microphones, require amplification before they are usable in a broadcast. Most mixers have specific mic inputs that will provide this needed amplification. Line level signals are already amplified to a usable level by the equipment generating them. A mixer will also typically have specific line level inputs. The audio leaving the mixer is typically line level.
Sound Frequencies
When talking about sound and audio, what we are really talking about is capturing and recording a sound wave. A sound wave is essentially a combination of audible vibrations that repeat at a combination of frequencies. Lower frequency sounds sound lower pitched while higher frequency sounds are higher pitched. Each person’s voice is typically a combination of frequencies that spans from the low end to the high end.
Master Faders, Sub-Master Faders, and Faders
The mixer’s Master Fader is the fader that controls the level of the audio leaving the mixer. It is the sum total of all the other faders on the board The individual faders control how much level is being sent to either the master fader or to a sub-master fader, also known as a group fader. The sub-master faders allow one fader to control the overall level of multiple other faders. Below are some signal flow examples.


Breaking Down the Basic Components
An audio mixer is made up of a series of channel stripes. Each channel controls and adjusts one audio source. To further break down the components of each channel, let’s move from the top to the bottom.
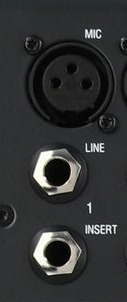
At the top of each channel stripe are the input ports. Most mixers will feature both a Mic input and a Line input. Additionally, many mixers will feature an Insert port which is only used if the audio signal is to be processed through an external piece of audio processing gear.
Below the input ports is the “Gain” knob. The gain knob is used to adjust how much amplification is applied to the signal coming into the channel’s input. The best way to think about this is the gain can either increase or decrease the maximum amount of level available to the fader below it.
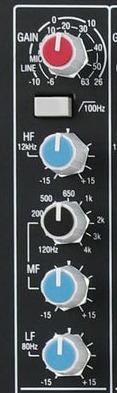
Continuing downward, the next knobs are the EQ, or equalizing, knobs. These knobs are used to manipulate the amount of specific frequencies present in each signal, by either amplifying or reducing the amount of the corresponding frequency present in the signal. The knob marked “High” or HF will adjust the amount of the high frequency sound present in the signal, while the “Low” or “LF” knob adjusts the low end frequencies. Most mixers will also feature either a few “Mid” or “MF” knobs that will adjust frequencies between the Low and High, or an adjustable knob that can change what specific frequency it alters and by how much.
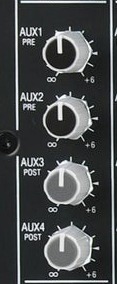
Below the EQ knobs are the Auxiliary Feed knobs. These will allow the signal on the channel stripe to be fed to an additional auxiliary mixer output, separate from the main mixer outputs. Some mixers will also have “group” knobs or buttons which will send the channel’s audio to a separate group fader that would act as a sub-master fader to allow one fader to control the level of multiple faders.
At the bottom of the channel stripe is the fader. The fader adjusts how much of the audio is sent to the mixer’s outputs. Most mixers will also have a “Pan” knob that will adjust how the audio is balanced between the left and right channel outputs. There is also a “mute” button that turns the channel off and a “solo” button that sends the isolated audio out the “monitor” and “headphone” outputs to hear what the individual channel sounds.

Lastly, there is the mixer’s master fader/faders. This fader will adjust the total output level of the mixer. Some mixers have a separate master for the Left and the Right channel, some have 1 combined L/R master fader and a separate fader for the Mono output.
